Create an Effective Contact Form with Astro

Web Reaper
9 min read
When you create a website for a client, odds are you’ll need to handle at least one form submission. Whether it’s a contact form, a newsletter signup, or otherwise. For a client this time around I decided to use Basin for the backend, as it’s easy to set up and free for a limited number of submissions.
Here’s how I did it, with all the code goodies (and user feedback).
What We’ll Build
Note: this contact form simulates waiting 2 seconds for a response from the server. Try it out!
Contact Me
Starting HTML and Styling
We’ll start with a simple contact form that has fields for name, email, and message. This uses Tailwind CSS for styling and is basic for this demonstration, but it’s not the worst looking contact form you’ve ever seen.
<div  class="not-content mx-auto my-3 rounded-3xl border border-gray-200 bg-gray-100 p-6 text-gray-900 md:p-10">  <h3 class="w-full text-center text-2xl font-medium">Contact Me</h3>  <form id="contact-form" name="contact form" class="mt-4 flex flex-col gap-3">    <input type="hidden" name="form-name" value="contact" />    <div>      <label for="contact-name" class="mb-1 text-gray-600">Name</label>      <input        type="text"        class="form__input"        name="name"        id="contact-name"        placeholder="Your preferred name"        required      />    </div>    <div>      <label for="contact-email" class="mb-1 text-gray-600">Email</label>      <input        type="email"        class="form__input"        name="email"        id="contact-email"        inputmode="email"        placeholder="Your best contact email"        required      />    </div>    <div>      <label for="contact-message" class="text-gray-600">Message</label>      <textarea        name="message"        class="form__input"        id="contact-message"        rows="4"        placeholder="write your message here"        required      ></textarea>    </div>    <button      type="submit"      class="focus-visible:ring-opacity-50 flex items-center justify-center gap-2 rounded-md bg-blue-600 p-2.5 text-white transition hover:bg-blue-700 focus:outline-none focus-visible:ring-2 focus-visible:ring-blue-600"    >      Submit    </button>  </form></div>
<style>  @import "tailwindcss/theme" theme(reference);
  .form__input {    @apply w-full rounded-md border border-transparent bg-gray-200 p-2.5 transition outline-none;    @apply focus-visible:border-blue-600/70 focus-visible:ring-2 focus-visible:ring-blue-600/50;  }</style>
Honeypot Field
One nice and easy way to catch bots is to add a honeypot field. This is a visually hidden field that bots will fill out, but real users won’t see. I like to purposefully misspell the field name to better trick bots. Add this in somewhere in your form HTML.
<!-- honeypot field to catch bots. Purposefully mispelled "email" as "emai" to better trick bots --><label for="emai" class="sr-only">Real users skip this field</label><input id="emai" type="text" name="emai" class="sr-only" tabindex="-1" />Basin Setup
Now let’s do all of our Basin setup!
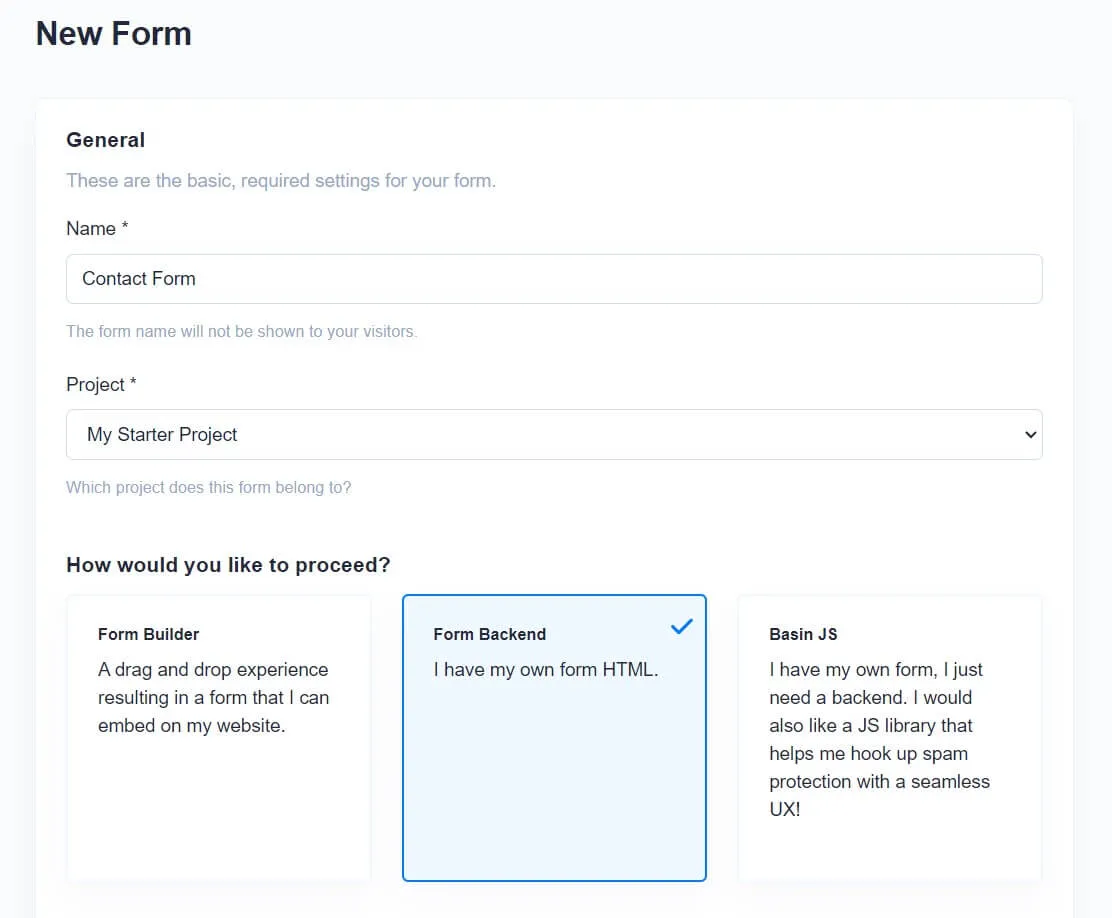
Create Account and Form
First obvious thing you’ll need to do, create an account with Basin. Once you’ve done that, create a new form. You’ll be given a form ID that you’ll need to use in your form’s action attribute.
Sign up (you can use the free plan for a limited number of submissions).

Create your form.
TIP
Select “Form Backend” as you already have your HTML form from the code above!
Now you’ll get your form endpoint. Don’t worry this was a test one I used and deleted, so you can’t spam me :)
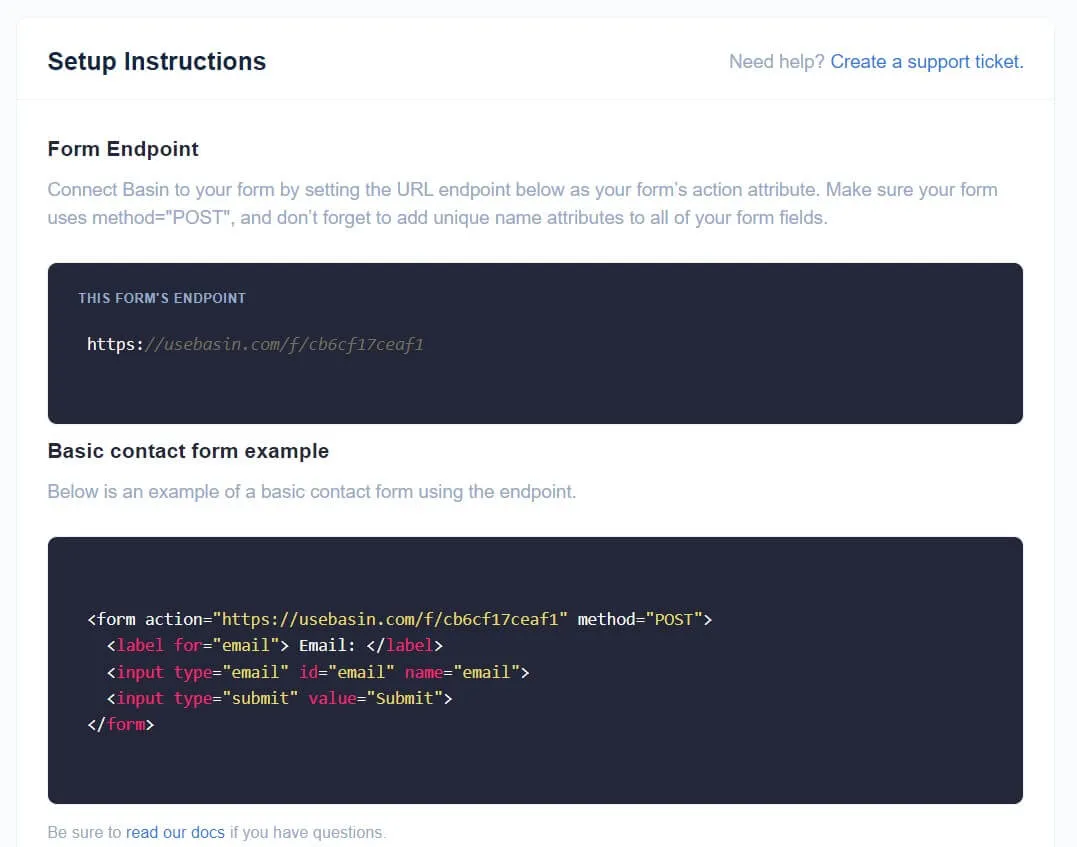
Add it to your form code.
<form action="https://usebasin.com/f/xxxxxxxxxxxx" method="POST" id="contact-form" name="contact form" class="mt-4 flex flex-col gap-3"> <!-- form stuff --></form>Setup Email Sending
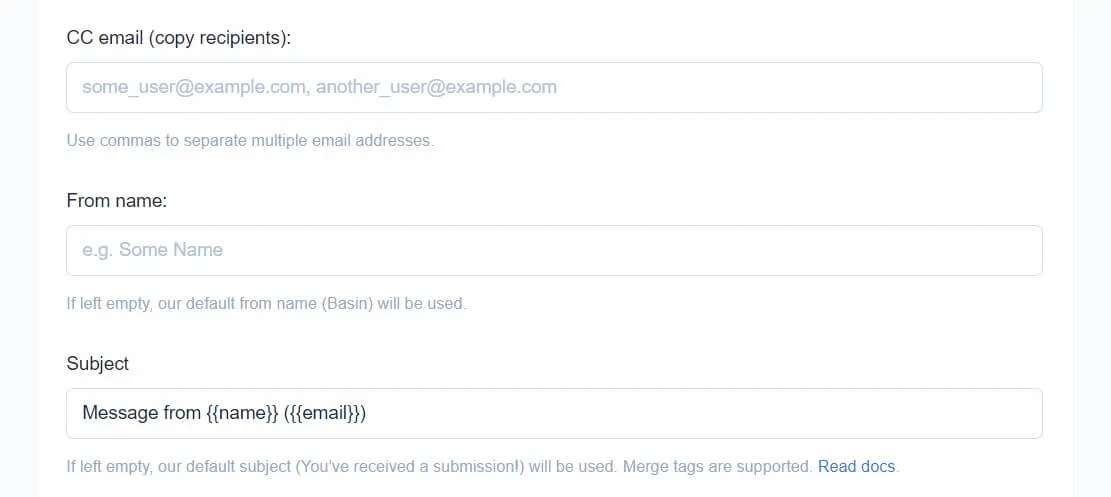
Now we can setup how the email will look, and who it will send to.
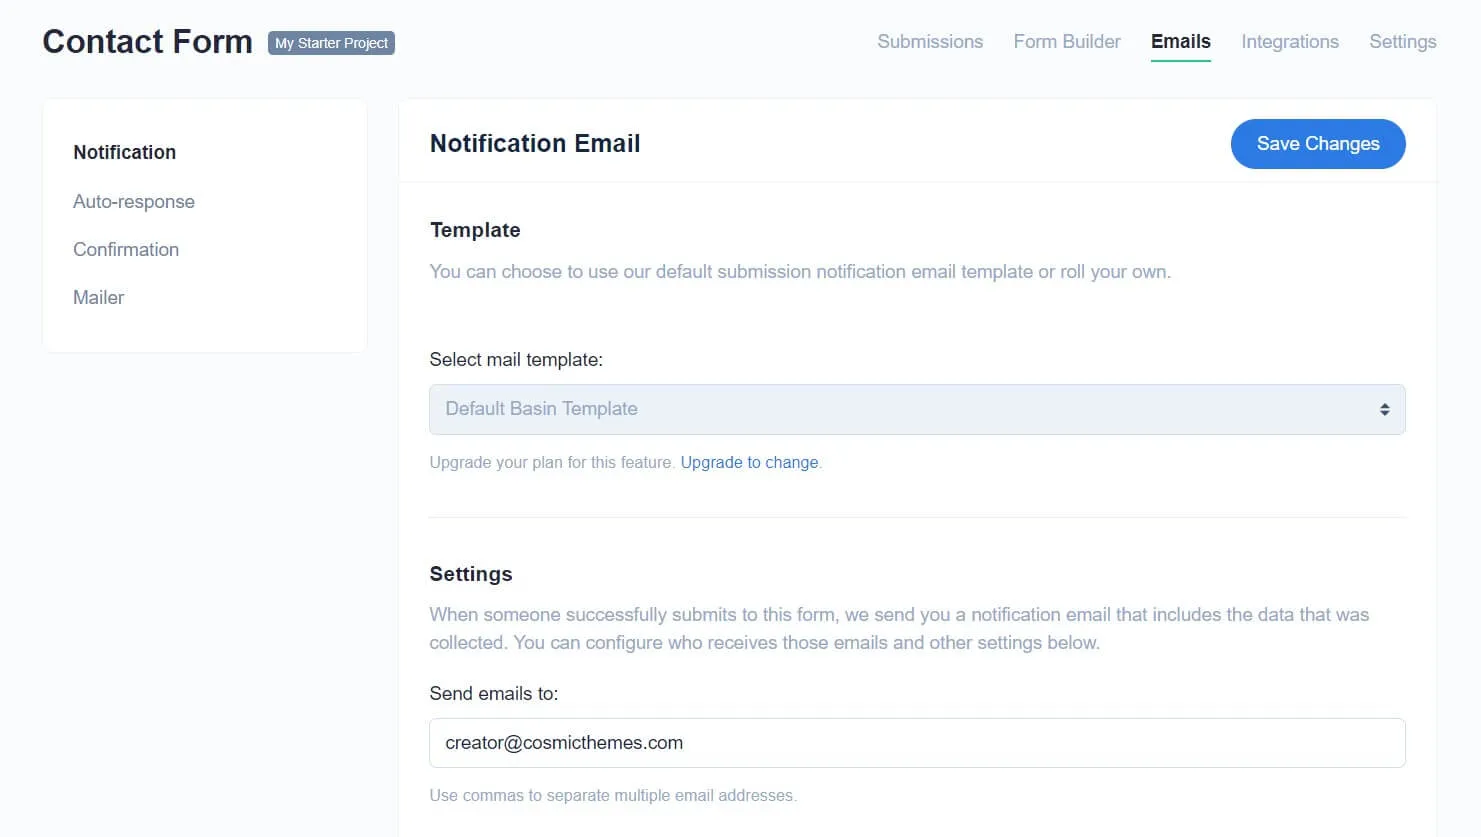
You can set the subject - I like to include the submitters name and email in the subject line. Note that these merge tags must match the “name” you give to a form input.
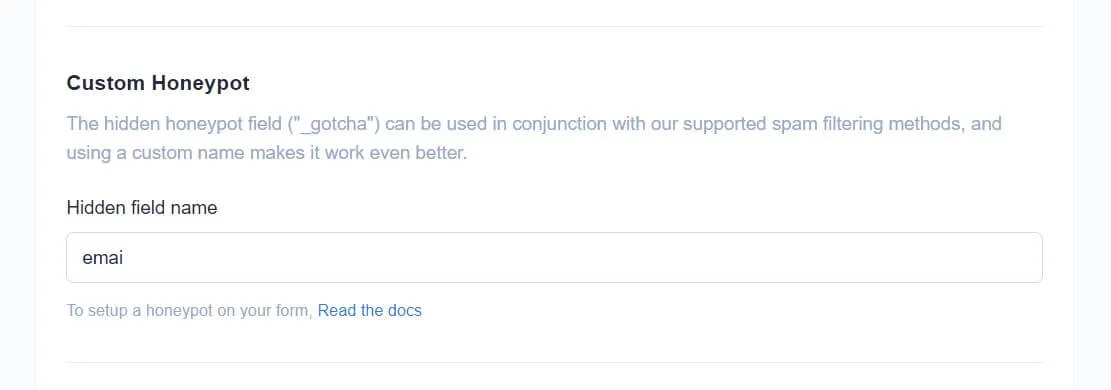
Basin Custom Honeypot
Since we added a honeypot field, you need to let Basin know what name you used for the field! This way Basin can ignore it when processing the form.
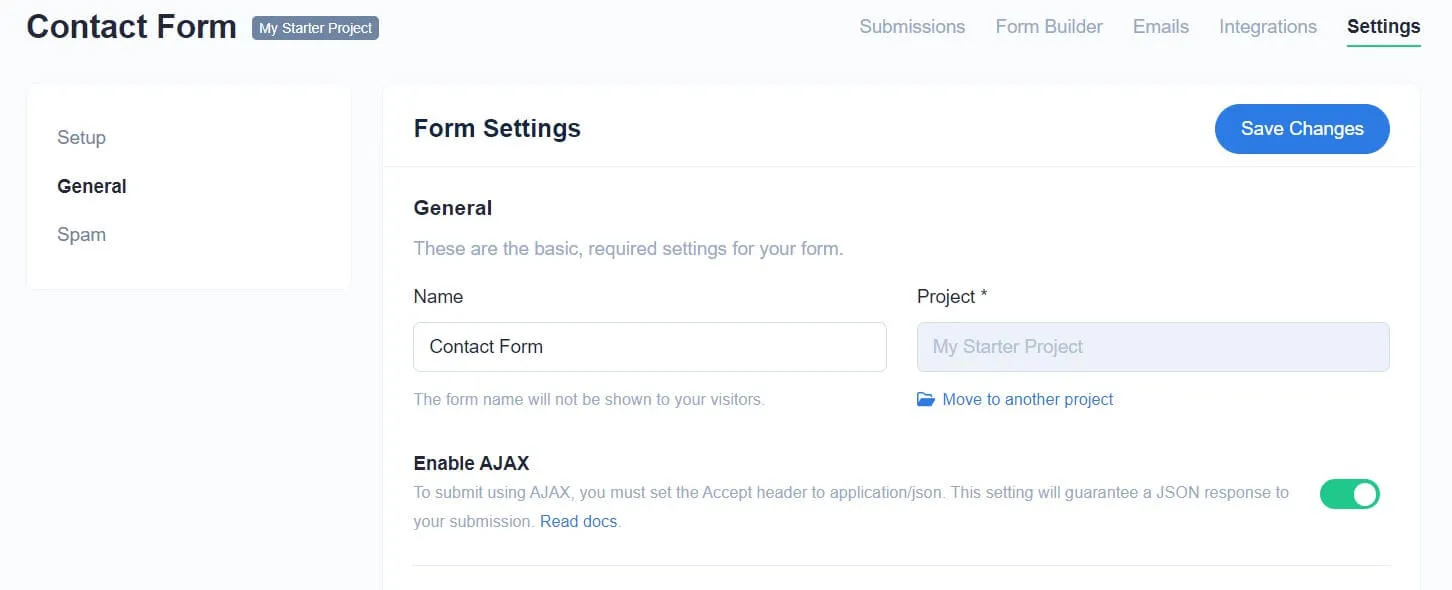
Enable AJAX
We’re going to use AJAX for the actual form submission, that way we can provide feedback to the user. So first enable it within Basin! We’ll get to the actual AJAX code shortly.
Form Submission
Now lets add that javascript.
AJAX Basic Setup
<script>  // handle the form submission  var xhr = new XMLHttpRequest();
  // only one contact form supported per page  const form = document.getElementById("contact-form") as HTMLFormElement;
  const handleFormSubmission = (event) => {    // prevent page from reloading    event.preventDefault();
    // get form data    const formData = new FormData(form);
    // create POST request to the form action attribute    xhr.open("POST", form.action, true);
    // make sure we receive json back    xhr.setRequestHeader("Accept", "application/json");
    // SEND IT!    xhr.send(formData);
    // once we get a response...    xhr.onload = function () {      const response = JSON.parse(xhr.response);
      if (xhr.status === 200) {        // The request was successful        console.log("Form submitted successfully.");        // reset form on successful email send        form?.reset();      } else {        const message = "Form submission failed with error: " + response.error;        console.log(message);      }    };  };
  form?.addEventListener("submit", handleFormSubmission, true);</script>
Feedback Dialogs HTML and Styling
Now let’s add some nicer feedback to the user.
<form>  <!-- form stuff -->
  <button    type="submit"    class="focus-visible:ring-opacity-50 flex items-center justify-center gap-2 rounded-md bg-blue-600 p-2.5 text-white transition hover:bg-blue-700 focus:outline-none focus-visible:ring-2 focus-visible:ring-blue-600"  >    <!-- your loading SVG here with id="form-loading" -->    <svg      id="form-loading"      xmlns="http://www.w3.org/2000/svg"      viewBox="0 0 24 24"      fill="none"      stroke="currentColor"      stroke-width="2"      stroke-linecap="round"      stroke-linejoin="round"      class="icon icon-tabler icons-tabler-outline icon-tabler-loader-2 hidden size-5 animate-spin"    >      <path stroke="none" d="M0 0h24v24H0z" fill="none"></path>      <path d="M12 3a9 9 0 1 0 9 9"></path>    </svg>    Submit  </button></form>
<!-- message send success feedback --><dialog  id="form-good-feedback"  class="invisible fixed bottom-4 z-10 mx-auto flex rounded-lg bg-green-200 p-0 text-green-800 opacity-0 transition duration-300">  <div class="p-4 text-center">    <p>Message sent successfully. I will get back to you.</p>  </div></dialog>
<!-- message send fail feedback --><dialog  id="form-bad-feedback"  class="invisible fixed bottom-4 z-10 mx-auto flex rounded-lg bg-red-200 p-0 text-red-800 opacity-0 transition duration-300">  <div class="p-4 text-center">    <p>Something went wrong. Please try again or contact me by email.</p>  </div></dialog>
Production-ready Astro Templates

Templates with tons of features others leave out. I18n, CMS, animations, image optimization, SEO, and more.
Form Submission Feedback
Now lets add the javascript to show appropriate feedback. Here I’m using timeouts to allow the form to fade in and out.
<script>  // handle the form submission  var xhr = new XMLHttpRequest();
  // only one contact form supported per page  const form = document.getElementById("contact-form") as HTMLFormElement;  const formLoadingIndicator = document.getElementById("form-loading");  const formGoodFeedback = document.getElementById("form-good-feedback");  const formBadFeedback = document.getElementById("form-bad-feedback");
  const handleFormSubmission = (event) => {    // prevent page from reloading    event.preventDefault();
    // show loading indicator    formLoadingIndicator?.classList.remove("hidden");
    // get form data    const formData = new FormData(form);
    // create POST request to the form action attribute    xhr.open("POST", form.action, true);
    // make sure we receive json back    xhr.setRequestHeader("Accept", "application/json");
    // SEND IT!    xhr.send(formData);
    // once we get a response...    xhr.onload = function () {      formLoadingIndicator?.classList.add("hidden");      const response = JSON.parse(xhr.response);
      if (xhr.status === 200) {        // The request was successful        console.log("Form submitted successfully.");        // reset form on successful email send        form?.reset();
        if (formGoodFeedback) {          formGoodFeedback.classList.remove("invisible");          formGoodFeedback.classList.add("opacity-100");
          // reset form feedback after a few seconds          setTimeout(() => {            formGoodFeedback.classList.remove("opacity-100");
            setTimeout(() => {              formGoodFeedback.classList.add("invisible");            }, 300);          }, 5000);        }      } else {        const message = "Form submission failed with error: " + response.error;        console.log(message);        // The request failed        if (formBadFeedback) {          formBadFeedback.classList.remove("invisible");          formBadFeedback.classList.add("opacity-100");
          // reset form feedback after a few seconds          setTimeout(() => {            formBadFeedback.classList.remove("opacity-100");
            setTimeout(() => {              formBadFeedback.classList.add("invisible");            }, 300);          }, 7000);        }      }    };  };
  form?.addEventListener("submit", handleFormSubmission, true);</script>
Final Code
So you have all the code in one place.
<div  class="mx-auto rounded-lg border border-gray-200 bg-gray-100 p-6 text-gray-900 md:p-10">  <h3 class="w-full text-center text-2xl font-medium">Contact Me</h3>  <form    action="https://usebasin.com/f/xxxxxxxxxxxx"    method="POST"    id="contact-form"    name="contact form"    class="mt-4 flex flex-col gap-3"  >    <input type="hidden" name="form-name" value="contact" />    <div>      <label for="contact-name" class="mb-1 text-gray-600">Name</label>      <input        type="text"        class="form__input"        name="name"        id="contact-name"        placeholder="Your preferred name"        required      />    </div>    <!-- honeypot field to catch bots. Purposefully mispelled "email" as "emai" to better trick bots -->    <label for="emai" class="sr-only">Real users skip this field</label>    <input id="emai" type="text" name="emai" class="sr-only" tabindex="-1" />    <div>      <label for="contact-email" class="mb-1 text-gray-600">Email</label>      <input        type="email"        class="form__input"        name="email"        id="contact-email"        inputmode="email"        placeholder="Your best contact email"        required      />    </div>    <div>      <label for="contact-message" class="text-gray-600">Message</label>      <textarea        name="message"        class="form__input"        id="contact-message"        rows="4"        placeholder="write your message here"        required></textarea>    </div>    <button      type="submit"      class="focus-visible:ring-opacity-50 flex items-center justify-center gap-2 rounded-md bg-blue-600 p-2.5 text-white transition hover:bg-blue-700 focus:outline-none focus-visible:ring-2 focus-visible:ring-blue-600"    >      <!-- your loading SVG here with id="form-loading" -->      <svg        id="form-loading"        xmlns="http://www.w3.org/2000/svg"        viewBox="0 0 24 24"        fill="none"        stroke="currentColor"        stroke-width="2"        stroke-linecap="round"        stroke-linejoin="round"        class="icon icon-tabler icons-tabler-outline icon-tabler-loader-2 hidden size-5 animate-spin"      >        <path stroke="none" d="M0 0h24v24H0z" fill="none"></path>        <path d="M12 3a9 9 0 1 0 9 9"></path>      </svg>      Submit    </button>  </form>
  <!-- message send success feedback -->  <dialog    id="form-good-feedback"    class="invisible fixed bottom-4 z-10 mx-auto flex rounded-lg bg-green-200 p-0 text-green-800 opacity-0 transition duration-300"  >    <div class="p-4 text-center">      <p>Message sent successfully. I will get back to you.</p>    </div>  </dialog>
  <!-- message send fail feedback -->  <dialog    id="form-bad-feedback"    class="invisible fixed bottom-4 z-10 mx-auto flex rounded-lg bg-red-200 p-0 text-red-800 opacity-0 transition duration-300"  >    <div class="p-4 text-center">      <p>Something went wrong. Please try again or contact me by email.</p>    </div>  </dialog></div>
<style>  @import "tailwindcss/theme" theme(reference);
  .form__input {    @apply w-full rounded-md border border-transparent bg-gray-200 p-2.5 transition outline-none;    @apply focus-visible:border-blue-600/70 focus-visible:ring-2 focus-visible:ring-blue-600/50;  }</style>
<script>  // handle the form submission  var xhr = new XMLHttpRequest();
  // only one contact form supported per page  const form = document.getElementById("contact-form") as HTMLFormElement;  const formLoadingIndicator = document.getElementById("form-loading");  const formGoodFeedback = document.getElementById("form-good-feedback");  const formBadFeedback = document.getElementById("form-bad-feedback");
  const handleFormSubmission = (event) => {    // prevent page from reloading    event.preventDefault();
    // show loading indicator    formLoadingIndicator?.classList.remove("hidden");
    // get form data    const formData = new FormData(form);
    // create POST request to the form action attribute    xhr.open("POST", form.action, true);
    // make sure we receive json back    xhr.setRequestHeader("Accept", "application/json");
    // SEND IT!    xhr.send(formData);
    // once we get a response...    xhr.onload = function () {      formLoadingIndicator?.classList.add("hidden");      const response = JSON.parse(xhr.response);
      if (xhr.status === 200) {        // The request was successful        console.log("Form submitted successfully.");        // reset form on successful email send        form?.reset();
        if (formGoodFeedback) {          formGoodFeedback.classList.remove("invisible");          formGoodFeedback.classList.add("opacity-100");
          // reset form feedback after a few seconds          setTimeout(() => {            formGoodFeedback.classList.remove("opacity-100");
            setTimeout(() => {              formGoodFeedback.classList.add("invisible");            }, 300);          }, 5000);        }      } else {        const message = "Form submission failed with error: " + response.error;        console.log(message);        // The request failed        if (formBadFeedback) {          formBadFeedback.classList.remove("invisible");          formBadFeedback.classList.add("opacity-100");
          // reset form feedback after a few seconds          setTimeout(() => {            formBadFeedback.classList.remove("opacity-100");
            setTimeout(() => {              formBadFeedback.classList.add("invisible");            }, 300);          }, 7000);        }      }    };  };
  form?.addEventListener("submit", handleFormSubmission, true);</script>
There you go! A nice contact for with feedback for the user. You can customize the feedback messages and the form’s appearance to suit your needs.
Production-ready Astro Templates
Templates with tons of features others leave out. I18n, CMS, animations, image optimization, SEO, and more.